
Wednesday, November 3, 2010
On a Pedestal
Monday, November 1, 2010
Autumn Spice

The base of the card is Early Expresso, layered on top with More Mustard which was thwacked (and yes it's a real word) with Old Olive. The top layer is a piece of the Autumn Spice (and I love that DSP). The Tree is from the Thoughts & Prayer's Stamp Set and is layered on Early Expresso, Old Olive thawacked in Early Expresso and on top is More Mustard thwacked in Old Olive. The Thinking of You (from the Oval All Stamp Set) tag is stamped in Early Expresso on More Mustard which has been thwacked in Old Olive and then layered onto an Early Expresso Scalloped Oval. The Old Olive buttons (retired last year) are threaded with ever so fine strips of More Mustard Cardstock - a trick my Downline, Kathi Rowell shared with me - and is layered onto 3/4" Early Expresso circles. Hope you enjoy this card.
Saturday, October 30, 2010
Card Class Sample - Going Gray
I wanted to share with you one of the cards we stamped at our Card Class this week. This card is so much prettier in person than it is here in the photo. The base of the card is Whisper White with a layer of Going Gray. Layered on top of that is Whisper White which has been Ticket Corner Punched. The Designer Paper is the Going Gray from the Neutrals Pack. The Flower is made from one each of the Scalloped Circle Punches, embossed with the Polka Dot Embossing Folder via the Big Shot, then the petals are clipped in a bit to form the petals. The center is a Gray Glimmer Brad which is available rigth now in the Holiday Mini Catalog. The Going Gray Ribbon is retired, but still in my inventory. Finally, the Tag is stamped with Going Gray and then layered onto a Going Gray Scalloped Oval.

Tuesday, October 19, 2010
All Occasion Card Class
Just wanted to give you one last update for tonight. October 27th, will be my next card class where we'll be stamping 4 All Occasion Cards and creating a cute 3-D item. Cost of the class is $10. Class will be in the evening only at 6:30. Please RSVP by Monday, October 25th so I will have your projects all cut and prepared for you.
Holiday Bundle Promotion
Check out the new Holiday Bundle Promotion on the side bar. It begins today. Let me know if you have any questions.
October Designer Paper Class
 Surprise, Surprise, Surprise!!! I have finally got back into action to update my Blog and to get my October Classes Posted. This is one of the cards we will be creating at my Designer Paper Project of the Month Class coming up on October 30th. You will be creating 8 different cards plus envelopes and a gift box all using the Deck the Halls Designer Paper from the Holiday Mini Catalog. Cost of the class is $25 which includes a package of the Designer Paper and all the ribbon you'll need to complete your projects. Class is at 10 a.m. Please RSVP with payment by Monday, October 25 and bring your own adhesive and scissors.
Monday, September 27, 2010
Let me know if you get it...

I just couldn't wait to post this any longer. Over the years, I've had just too much fun with this. It all started with a customer I waited on years ago when I was working at Sobak's Cards & Gifts in Owosso, who came to my register with a pin on his jacket which looked much like the post to the left.
I was be-fumbled what it meant. Let me know if you figure it out.
Christmas Postcard
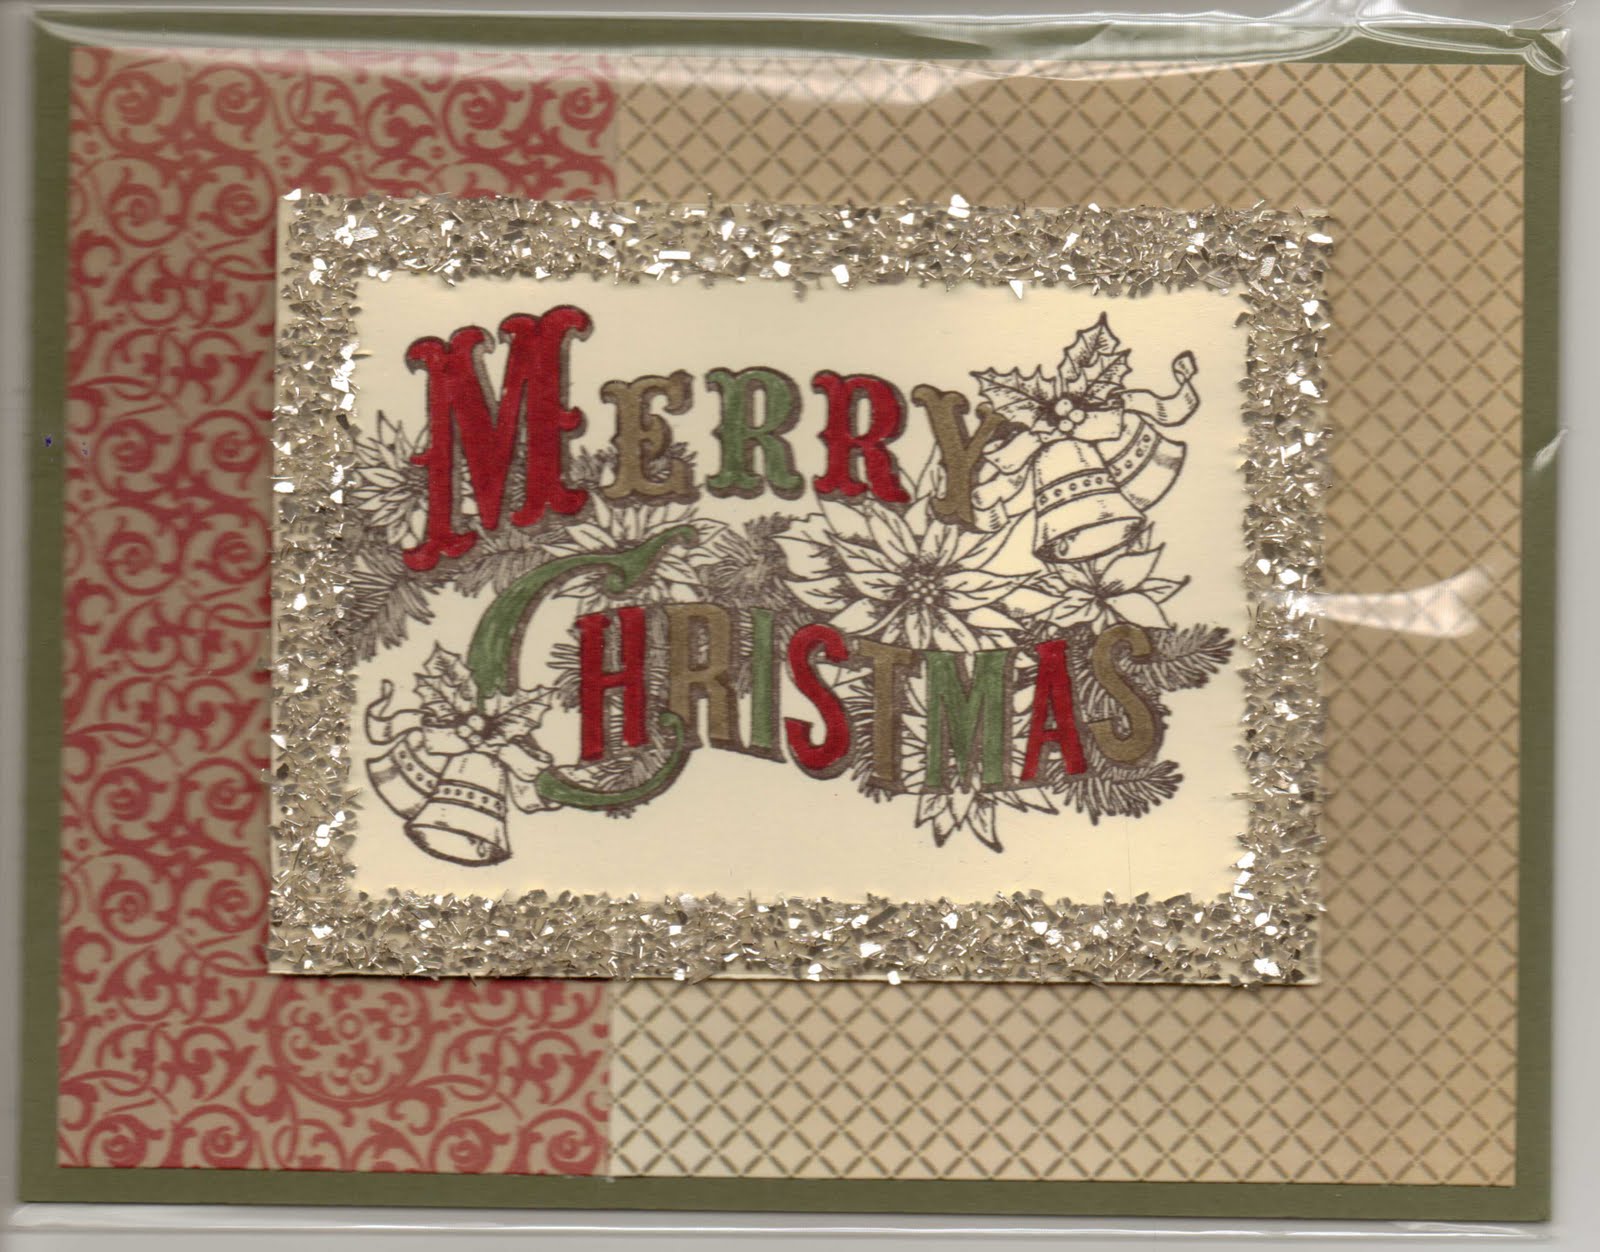 Happy Monday - I've finally gotten around to posting for today. I kept trying to get one more thing done before I stopped to scan this beauty of a card which was cased from fellow Demonstrator, Melissa Stout. I switched out some of the Designer Paper from the Holiday Occasions Mini Catalog - Deck the Halls (120810 $9.95). The Christmas Postcard Stamp (121428 $9.95) was stamped with Always Artichoke Ink onto Very Vanilla Cardstock and colored in with Cherry Cobbler, Soft Suede and Always Artichoke markers. To add the Silver Glass Glitter (120995 $3.95) I first outlined the Very Vanilla cardstock with Sticky Strip and then just sprinkled the glitter over it and tapped it down with my finger. Then all was layered onto Always Artichoke cardstock. This photo does not do this card justice. It's a beauty of a card. Hope you like it.
I'll be working on my October class schedule today. I am going to incorporate a sewn Rag Bag purse class using our new Fabric from the mini and also a Designer card class with the Deck the Halls paper.
This Friday and next I'll be traveling north to Big Rapids to hold Christmas Classes for what could be a couple very large groups. I sent in the order today for the supplies, which should be delivered on Wednesday. Then it's cut, cut, cut to get ready. Lovin' it. I have the projects all laid out in their totes, just waiting for the remainder of the supplies to be added to complete the projects.
Be watching in the upcoming days for the projects.
Friday, September 24, 2010
Good Morning Friends

Today is my All-Occasion Stamp-A-Stack where the girls will be creating 6 quick and easy cards. I'll post one now and then post some of the others later.
This card turned out so pretty. I tweeked it from a swap card I received at Convention, and I love the way "tweeking" turned out.
The base of the card is Confetti White Cardstock. The Designer paper is Perfect Plum from the Designer Series Subtles Pack (117152 $19.95) and the Certain Celery Cardstock is punched with the Ribbon Border Punch (119275 $15.95). The flower is the Big Shot (113439 $99.95) Die Blossom Party (115971 $17.95) which I absolutely love. The little Certainly Celery button, isn't it just so cute, is from the Subtles Designer Buttons (119745 $8.95). To finish off the card I stamped the sentiment from Word Play in Perfect Plum.
Wednesday, September 22, 2010
Jolly Holiday Card

Hi Gals,
Here's a quick and easy Christmas card created using the Jolly Holiday Designer Paper (117159). The coordinating colors are Cherry Cobbler and Old Olive. To accent the card, I punched the Old Olive cardstock with the new Ribbon Border punch (119275) and added some pearls (119247 - $4.95).Then the tag (from Perfect Punches) is colored with Cherry Cobbler and Old Olive Markers, punched with the Scallop Circle punch and popped up with Dimensionals.
Here's a quick and easy Christmas card created using the Jolly Holiday Designer Paper (117159). The coordinating colors are Cherry Cobbler and Old Olive. To accent the card, I punched the Old Olive cardstock with the new Ribbon Border punch (119275) and added some pearls (119247 - $4.95).Then the tag (from Perfect Punches) is colored with Cherry Cobbler and Old Olive Markers, punched with the Scallop Circle punch and popped up with Dimensionals.
Oh My Goodness
I know it's been a while since I've posted, but I didn't realize it's been 2 1/2 weeks!! Ikes!! No wonder some of you have asked me what was going on... Oopsie, as my BFFPA would say.. It seems like I'm going in several different directions, and always trying to stay focused, but, for those of you who know me, staying focused is not one of my strong points.
Let's see.. what's been happening?? Hubby and I took a 4 day weekend to the west coast of Michigan, beginning in Grand Haven and having a back yard bar-b-q with the cuz'ins in the rain, then back to the cuz'ins for Sunday brunch the following morning. After filling ourselves on sausage casserole, love that stuff, we headed toward Ludington for the night. The following morning we headed out toward Paris to visit some of the same cuz'ins and have lunch before heading on home. Such a wonderfully relaxing 4 days, it was.
Let's see.. what's been happening?? Hubby and I took a 4 day weekend to the west coast of Michigan, beginning in Grand Haven and having a back yard bar-b-q with the cuz'ins in the rain, then back to the cuz'ins for Sunday brunch the following morning. After filling ourselves on sausage casserole, love that stuff, we headed toward Ludington for the night. The following morning we headed out toward Paris to visit some of the same cuz'ins and have lunch before heading on home. Such a wonderfully relaxing 4 days, it was.
Thursday, September 2, 2010
Christmas Tag Invite
Good Morning Gals - Just wanted to share with you a something little I do for my Hostesses.  I mail out their invites for them. And, their invites are of course, a hand stamped card. This card you could actually use as a gift tag since only the little white tag in the middle opens. It would be cute to write your "to" and "from" on the inside and slip the card into an envelope to attach to a gift. The card base is Real Red and layered on top is Whisper White Cardstock which has been Die Cut on the Big Shot using the Top Note Die and then also embossed with the Polka Dot Embossing Folder. The tag is layered on Real Red, then layered on top of Crum Cake. The ribbon is the 1/8" Taffeta Early Expresso. The snowman is from the Cute Christmas stamp set (Clear Mount 121133 $18.95) in the new Holiday Mini and colored in with Crum Cake and Real Red Markers. He's such a happy looking snowman.
I'd love to send a hand stamped card to your friends inviting them to your Stampin' UP! party. I still have one Friday open in September and two in October. They're filling up fast. As an added plus for being a Hostess, I'll send you a weekly hand stamped card to add to your collection. I do all the work. All you have to do is invite 4 - 40 of your friends over for a girls night out! If you haven't received my September Calendar of Events and would like one, just let me know. I have several classes coming up that I'm sure you'll be interested in.. I.E. Technique Tuesday, Big Shot Group, a Halloween Project of the Month.
 I mail out their invites for them. And, their invites are of course, a hand stamped card. This card you could actually use as a gift tag since only the little white tag in the middle opens. It would be cute to write your "to" and "from" on the inside and slip the card into an envelope to attach to a gift. The card base is Real Red and layered on top is Whisper White Cardstock which has been Die Cut on the Big Shot using the Top Note Die and then also embossed with the Polka Dot Embossing Folder. The tag is layered on Real Red, then layered on top of Crum Cake. The ribbon is the 1/8" Taffeta Early Expresso. The snowman is from the Cute Christmas stamp set (Clear Mount 121133 $18.95) in the new Holiday Mini and colored in with Crum Cake and Real Red Markers. He's such a happy looking snowman.
I'd love to send a hand stamped card to your friends inviting them to your Stampin' UP! party. I still have one Friday open in September and two in October. They're filling up fast. As an added plus for being a Hostess, I'll send you a weekly hand stamped card to add to your collection. I do all the work. All you have to do is invite 4 - 40 of your friends over for a girls night out! If you haven't received my September Calendar of Events and would like one, just let me know. I have several classes coming up that I'm sure you'll be interested in.. I.E. Technique Tuesday, Big Shot Group, a Halloween Project of the Month.
Wednesday, September 1, 2010
Leadership Night Card

I cannot believe it's been a week since I posted. One of my best friends, Colleen, rode to Jackson with my this past Wednesday to meet my daughter-in-law, Meghan, and grandkids, Grant and Emma. We met in Jackson because that was about 1/2 way for both of us to drive, since they were coming from K-zoo. We loaded up the kids in my vehicle for a trip to Grandpa's and Grandma's and a visit lasting until Sunday. The kids were so good, and we so enjoyed having them. One of the days we grabbed another grandson, Owen, and took all three to Chuckie Cheese's for fun and pizza. I still think Chuckie's has one of the best pepperoni pizza's around. It's been 8 years since we were there, and as soon as I bit into the pizza, I remembered how good their's was.
So, not to make excuses for not posting this past week, but that's my excuse and I'm sticking to it.. tee, hee, hee.
On to a new post. This is a card that we made in a Shoebox Swap at my Upline's Leadership night recently. If you look close, you can see that the wreath is actually the bird from the Bird Punch. It was kind of fun to make. You first start out with a punched circle, I'm thinking about 1 3/4" and 8 of the Garden Green punched birds. Adhere your birds first at 12, 3, 6 and 9 and then fill in with the remaining 4 birds. Then with 8 Real Red punched birds, you do the same thing, but bring in the heads closer to the center of the circle. Next, you take punched Real Red wings, and spiral them into the center of the circle and finish with a Daffodil Delight punched center. To finish the card, we embossed the Whisper White with the new Snowflake Embossing Folder, which is available beginning today, and stamped the sentiment in Real Red. Now, take notice, I goofed and adhered the card with the stamped Merry Christmas upside down so my card is one for the giggle pile. OOps!!
Let me know what you think. Have a great day. Till tomorrow, keep those fingers inky!
Brenda
Wednesday, August 25, 2010
Another awesome card
 Good Morning Gals - This card was created with one of the stamp sets (Just Believe) we received at Convention in July.
I absolutely love this set. It has to be one of my favorites. You can create so many beautiful cards with this set. This card is so easy to stamp and after recreating this same card in Chocolate Chip and Rich Razzleberry, (and friend, Dianne, created it in Certainly Celery), I believe this card would be beautiful stamped in any color. The card at the right is stamped in Night of Navy. Several of you may have received this same card in the mail recently.
To create the card (I think you can figure out the layering) you stamp the cluster of flowers in the center of the cardstock and without re-inking, pick up slightly and stamp in one direction and then pick up slightly and stamp in the other direction. Super quick and easy. And, even tho I made it into a "just for you" card, it would certainly work for a Birthday, Anniversary, Thank-You or Sympathy card.
Have a great day. Stay tuned each day for new cards.
Brenda
Tuesday, August 24, 2010
Christ is Born

You will absolutely love this card. And, it was so easy to make. I got the instructions for the foil technique from my Downline and friend, Kathi. To create this card, you first cover your cardstock (which will be under the foil) with Stampin' UP!'s Anywhere Glue Stick and then carefully lay aluminum foil over the top and smooth it out. Set it aside for 5 - 10 minutes to dry. Then, to make the texture, you use your favorite Big Shot Embossing Folders and run it thru your Big Shot. One this card we heat embossed the "Christ is Born" with Silver Embossing powder and layered it onto Rich Razzleberry Cardstock. The ribbon is also Rich Razzleberry. Let me know what you think. It's really GO - Jus!!
Paisley Prints Tree

Good Morning! I can't believe I forgot to update with a new card yesterday. So today, you'll get to see two for the price of one blog search! Both of these cards are from our Team Stamp Night last Thursday. The first one is using the Paisley Prints tree on Naturals Ivory, with Garden Green and Riding Hood Red, with Very Vanilla 3/8" Ribbon and a Rhinestone at the top of the tree for some added "bling." Oh, yes, and we used Teeny Tiny Wishes for the Merry Christmas. As you can see, it has paper piercing on the tag and on the card itself. I think if I were doing it again, I would also add piercing along the edge on the Riding Hood Red. Oh, and it also uses our new border punch and corner rounder. Let me know what you think.
Saturday, August 21, 2010
DBD Card

Hi there - I keep forgetting to share a card I received from DBD (Stampin' UP's! Demonstrator Business Development) for my recent promotion to Sr. Manager. I have been on bi-weekly conference calls with Rett Christenson, who has been sharing ways to help grow your business, I.E. motivating your downline, increasing your own sales, booking more workshops, hostess coaching and so on. I was totally surprised to open this card from Stampin' UP! Who doesn't love receiving cards in the mail?
Today was a very exciting new Catalog Kick-Off meeting put on by my Upline, Ronda Wade, which focused on the items in the new Idea Book and Catalog and also in the new Holiday Mini which debutes on September 1st. If you haven't received either of yours yet, just let me know.
I will be sharing with you in the next few days some of the projects and ideas that were shared today at Ronda's Kick-Off. Oh, yes, and last night she had a Leadership Night. We had such a great time stamping our Shoe-Box Swaps, playing bingo and sharing fun and stories with one another. More sharing of swap cards in the days postings to come.
Have a great evening and happy stamping!
Wednesday, August 18, 2010
Christmas Card Stamp-A-Stack #3

Good Morning! What a wonderful day. It's hump day and I have so many things planned - mostly stamping. Today's card is totally cased from my Upline, Ronda Wade, and uses the new Snowflake Embossing Folder that will be available in the new Holiday Mini Catalog September 1st. This card uses Whisper White, Baha Breeze and Blushing Bride Cardstock, Pretty in Pink and Whisper White 3/8" Taffeta Ribbon, and the new Rhinestones. So quick and easy. Check back tomorrow for another Christmas Card idea.
Tuesday, August 17, 2010
Stamp-A-Stack Card #2
 Here is Stamp-A-Stack card number 2. This was actually CASED from a fellow demonstrator, whom I can't recall. Sorry, I can't give full credit where credit is due. This card has the Cherry Cobbler base with Jolly Holiday DSP with Old Olive Scallops using the new Scallop Trim Border punch. The NOEL is from the Big on Christmas stamp set and is water colored using Old Olive and Cherry Cobbler inks. It's a very easy card to duplicate.
This week is a busy week with three different tele-conferences to listen to, a Team Stamp Night on Thursday - which I can't wait for since I love getting my Downline together once a month to stamp, chat and share ideas. Friday evening, my Upline, Ronda Wade, is having a Leadership Night for her Team and on Saturday she's having a new Catalog Kick-Off which my BFFPA, Dianne and I will be doing one of the demonstrations. Our projects will be using the Candy Cane Theme from the new Holiday Mini which is released on September 1st. Watch in later posts for samples from the Mini.
Have a great day and keep those fingers inky!
Monday, August 16, 2010
August Christmas Card Stamp-A-Stack
 Good Morning - I just wanted to begin the week with one of the cards we made (cased and tweeked from fellow stamper, Kathi Rowell) at our Christmas Card Stamp-A-Stack on Thursday. The card base is from Crum Cake, with the Always Artichoke cardstock on top, then both are run thru the Big Shot with the Polka Dot Empressions Folder then Soft Suede Ribbon is afixed with Sticky Strip over the seam. You can see which punches we used. Then used the 5/16" Very Vanilla Brad for the flower centers. Hope you enjoy the card and please leave a comment.
Thursday, August 12, 2010
Class Day today

Good Morning Ladies,
This afternoon and again this evening we'll be stamping this month's Christmas Cards - 20 cards, 4 each of 5 designs plus envelopes. I'm just about ready. If you know me at all, I don't complete everything a day or two early.. it builds excitement if some things just don't get done until the last minute. I'll post the cards tomorrow, or the first of next week for you to see.
The card above was created by fellow Demonstrator, Lynn Schulz. Isn't it beautiful? This was one of the swaps I received at Convention this year. I love the Tempting Turquoise against the Black and White. I know we'll be re-creating this card in one of my upcoming Card Classes. Wouldn't you love making this and adding it to your collection?
Last night daugher, Heidi, and her family had us over for dinner, prepared by Candy, the Mother-in-law, who is visiting from Denver. As usual, Candy outdid herself again with a delicious dinner. Plus, as a side, Heidi had cut up chunks of cheese they'd just recently picked up on their way thru Pinconning. Doesn't get better than that.
I need to scoot since there are some loose ends to tie up before my Stamper's come after lunch. Have a great day and keep those finger's inky!
Brenda
Wednesday, August 11, 2010
Season's Greetings
 Good Morning - This photo just doesn't do this card justice. The card is sprayed with Champaign Shimmer Paint (maybe 8 drops mixed in with about 2 ounces of rubbing alcohol) and just really sparkles. This is another card we did in last month's Christmas Card Stamp-A-Stack. Hint: if you stare at it long enough, you can almost see it sparkling... tee, hee, hee... The card is made with Early Expresso and Crum Cake Cardstock, Early Expresso Ink and Season's Greetings Stamp set.
Owl Punch
This card is "just so darn cute" as my daughter would say. This is really a group effort and I have to give credit for those on my Team who had input - Tina, Kathi, Dianne (our adopted Team Member) and Meg, who incedently punched out enough owl parts for 48 cards for my Christmas Card Stamp-A-Stack last month.
I have heard so many comments on this card. It would also make a cute Anniversary or Birthday card.

We used Naturals Ivory, Cherry Cobbler, Old Olive, Early Expresso, Blushing Bride and Crum Cake Cardstock: Cherry Cobbler Ink: the Owl and Bird Punch, and the Jolly Holiday Designer Paper.
Daily Post
Thanks to all of you who caught up with my latest post on Facebook and requested I upload those photos to my Blog. I appreciate your comments. Here goes for the uploads..

This idea came entirely from fellow Demonstrator and Stamper, Tamie Ackerson from a similar card she demonstrated at our RubberQueen meeting a few months back. I just tweeked it using Crum Cake and Early Expresso and the Just for You stamp set we received in our Convention Bag. The Scalloped Oval is a Big Shot Die.
Stop back again and keep those fingers inky.
Code word for today: RubberQueen
Tuesday, August 10, 2010
Touch Base Tuesday

Good Morning Gals,
I'm getting a later start posting than what I wanted. Today I'll be cutting and preparing for this months Christmas Card Stamp-A-Stack where we'll be creating 20 Christmas Cards - 4 each of 5 designs. I have the designs all planned, now just to cut for each of them. Today is the last day to RSVP, so if you haven't already, there is still time.
This card design is from another Demonstrator and show's the 5 new In-Color's plus if you look closely it also shows 5 different textures from our Big Shot Embossing Folders. It is a great design because you only need 1" by 3 3/4" strips of cardstock, in your choice of colors. We all have a scrap bin of cardstock that would easily turn into this card.
The Code Word for today is: Embossing. Email me the Code Word before I post tomorrow, and your name will go into a weekly drawing.
Happy Stamping and keep those finger's inky.
Brenda
Monday, August 9, 2010
It's Monday - Time for a new Post

Hi Gals,
What a busy weekend we had. Started out doing what I love to do - sharing what I love (which by the way was the theme for Convention this year - Share What You Love) at a Class in Flushing with some gals who have followed me for most of 7 years!! Kudo's to them!! They had seen several projects at previous classes and workshops and wanted a class tailored to these projects that they had picked out. Of course, I threw in a few surprise projects along the way. So, with that being said, just let me know if you'd like to get a few friends and family together to make projects for Fall, birthdays or the Holidays.
Incedently, this morning I updated my planner with the 12 Weeks Before Christmas project dates. Don't sigh, it will be here before we know it, and that's why I'll be offering projects that you can make for gifts and yourself for the 12 weeks prior Christmas.
Now, with that being said. I wanted to share with you a card that my BFFPA (Best Friend Forever - Personal Assistant), Dianne Emery, created. I almost think she said she CASED it, (Copy Everything & Share/Everyone) but, I'll give her the credit in case it wasn't CASED afterall.
This card is one that we'll be creating in one of my upcoming Christmas Card Stamp-A-Stacks. Today is the last day you can RSVP with payment for this Thursday's class. Cost of the class is $25 which includes 20 cards (4 each of 5 designs) including envelopes. Times of the class are at 1:30 and 6:30. Bring your own adhesive and scissors.
I do have a Birthday Themed Project of the Month Class planned for this coming Saturday where you'll be stamping several birthday cards including a child, man and women and a couple of quick and easy Birthday Gift projects. Time of the class is at 2 p.m. and the cost is $15. Bring your own adhesive and scissors. Thursday is the last day to RSVP with payment.
Keep watching. I've hidden a Code word into today's post. It's the word "Birthday." If you email me with the Code word, your name will go into a weekly drawing for a Stampin' UP! surprise.
The Code Word changes daily so check back often. One entry per day and a new Code word each day.
Have a good one and keep those fingers inky!
Friday, August 6, 2010
Christmas Card Stamp-A-Stack
Hi there - I know I haven't posted in a LONG time, but will try and not do that again.
I'd like to invite you to my next Christmas Card Stamp-A-Stack, this coming Thursday, August 12th at 1:30 or 6:30 in my Rubber Room. Cost of the class is $25 which includes 20 cards (4 each of 5 designs) plus envelopes. RSVP with payment by Monday, August 9th. Bring your own adhesive and scissors. Below are the cards we made at the July Stamp-A-Sack. Hope to see you on the 12th.
 The card on top showcased our new Ornament Punch and our Basic Rhinestones to give it a little Bling. We stamped with Old Olive, Cherry Cobbler, and Soft Suede ink.
 This card is stamped on the new Crum Cake Cardstock using Early Expresso Ink. Once finished we spritzed it with Champaign Shimmer Paint which was mixed (about 10 drops) into a 2 ounce bottle of rubbing alcohol. It's beautiful. You really can't see all the shimmer.
 Stampin' UP! introduced a new Dotted Scallop Ribbon Border punch and it's such a neat addition to a card. You almost don't even need ribbon. This card is stamped with Night of Navy ink onto Natural's White Cardstock.
 Everyone loved this card. Stamped with Real Red and Old Olive inks onto Very Vanilla and Old Olive cardstock. We cut out two of the Real Red flowers and one of the Old Olive flowers and layered them together with the Gold Brads and popped it up with a dimensional. Lastly, a piece of Certainly Celery ribbon to finish the card.
 Aren't these two the cutest? This is the new hottest Punch ever! The Owl Punch ($16.95 118074) and the branches are from the Two-Step Bird Punch ($16.95 - 117191). The Merry Christmas is stamped with Cherry Cobbler ink. Cardstock is Naturals Ivory, Old Olive, Cherry Cobbler, Crum Cake, Early Expresso and the Designer Paper is Jolly Holiday ($9.95 - 117159).
Hope you enjoyed looking and will visit again often.
Subscribe to:
Posts (Atom)


